3D Printer Parts
Extruders
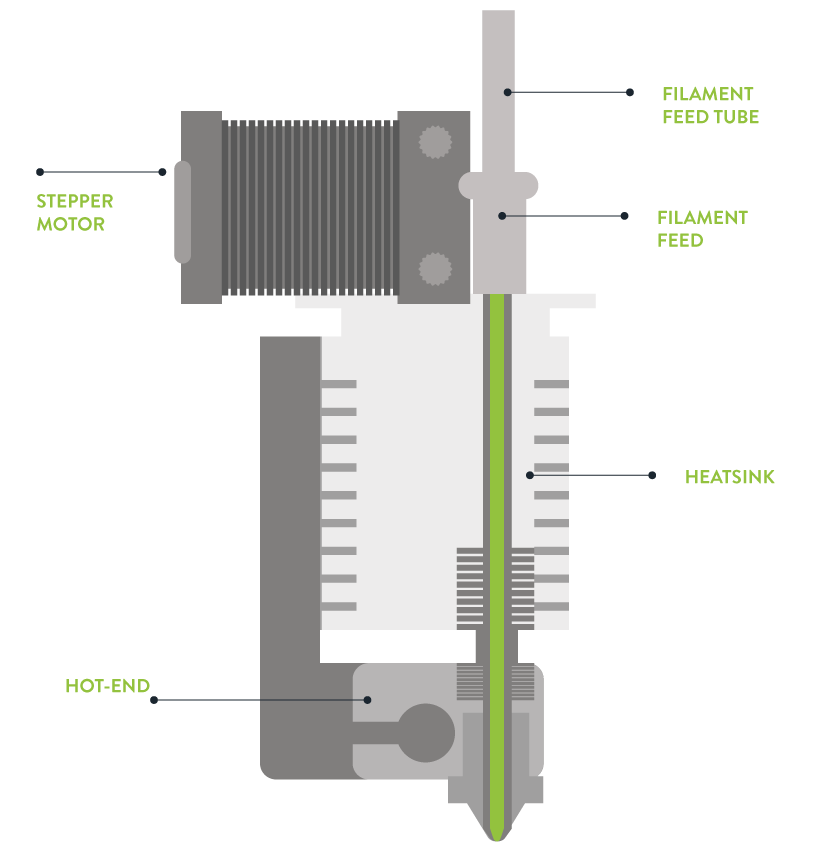
Extruders are a crucial component in 3D printers. In simple terms, the extruder is the tool that holds the filament in place and controls the amount that is fed into a Hot-end. One key point is to highlight that hot-ends are not the same as an extruder, but rather they are attached to it and they are the main location that is tasked with the melting process.
Extruders come with a stepper motor that allows for the filament to be fed through. Additionally, some form of gearing and hobbed shaft to hold the filament in place, a fan in some cases, a heat sink for better temperature regulation and finally the hot end.
Extruders can come as a dual setup or a single extruder. Dual extruders give the option of printing with a support material that is used to hold up certain designs which may require it due to the complexity of the object. Additionally, a dual extruder system can be independent or dependent. This means that with a independent system, you have the additional option of being able to print with multiple materials within a single object and not just being able to print with support material which is only available with standard dual extrusion systems. There are two types of extruders that are used in the 3D printing industry. These are Direct Extruders and Bowden. The main difference between the two is that in Direct Extruders, the motor that drives the filament and the hot end are directly attached to the extruder body. Bowden on the other hand includes a separation tube between the extruder and hot end, where the extruder, including the motor and other components can be attached to the printer chassis.
Each type has its own drawbacks and benefits.
Direct Drive:
Advantage: Can print with a wider variety of materials because the hot end and extruder are close to each other.This
Disadvantage: Because both parts are attached, this leads to issues when printing at high speeds since the overall mass is higher.
Bowden A:
Advantage: Lower issues due to less mass needing to be moved.
Disadvantage: Problems with printing with certain filaments like flexible materials.
Print bed
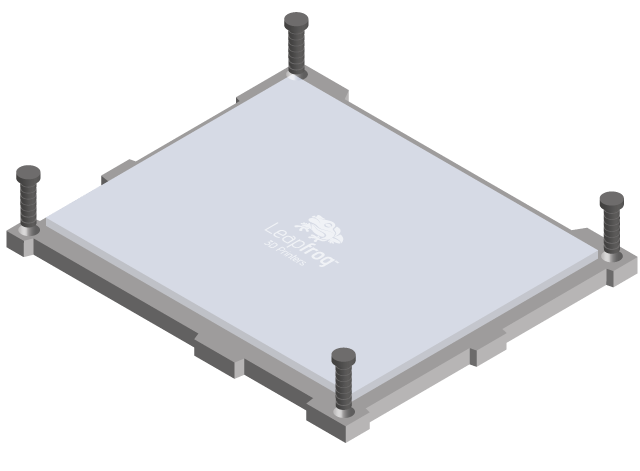
A print bed is the part that the 3d printed object rests on during the printing process. As each layer is extruded, the print bed moves down to allow for the next layering step. Although being simple, a print bed is an important part of a 3D printer. Although a relatively easy process, 3d printing does require some careful calibration to ensure that you get a perfect print without deformities. Therefore, the most important step is to ensure that you print the first layer accurately.
The first layer is important because any mistakes in this layer will be magnified to the overall structure of the intended part. The first layer indicates if the print bed is levelled correctly, it indicates that you have the correct extrusion settings such as amount, temperature and more.
A print bed should provide sufficient adhesion to the molten material, ensuring the object adheres to the bed. This is key because the extruders are moving components and if the plastic doesn’t properly attach to the bed, the movement will create many issues to the first layer as it cools. Additionally, due to cooling, the plastic can deform which is known as warping, by peeling away from the bed floor.
Which type of print Bed?
Print beds can come in a number of materials but the two most common are aluminium and glass. These both offer a smooth surface for the object to rest on, however because of the surface, this can cause adhesion issues. To combat this, print beds can come heated or a user can apply a gluing agent to help with bed adhesion which is strong enough to hold the object, but also allow for easier removal once printed.
Gluing agents come in various forms, from a standard glue stick, hairspray and special sheets you attach on to the print bed. These options are all relatively cheap and it is recommended to always use some form of agent to reduce issues that can occur.
Heated print beds reduce the chance of the object warping since they provide heat to the first layer, ensuring no random pockets cool faster than others. Aluminium beds offer the most uniform heat distribution, but aluminium itself expands significantly as its temperature increases which can cause problems. Glass
Hot Ends
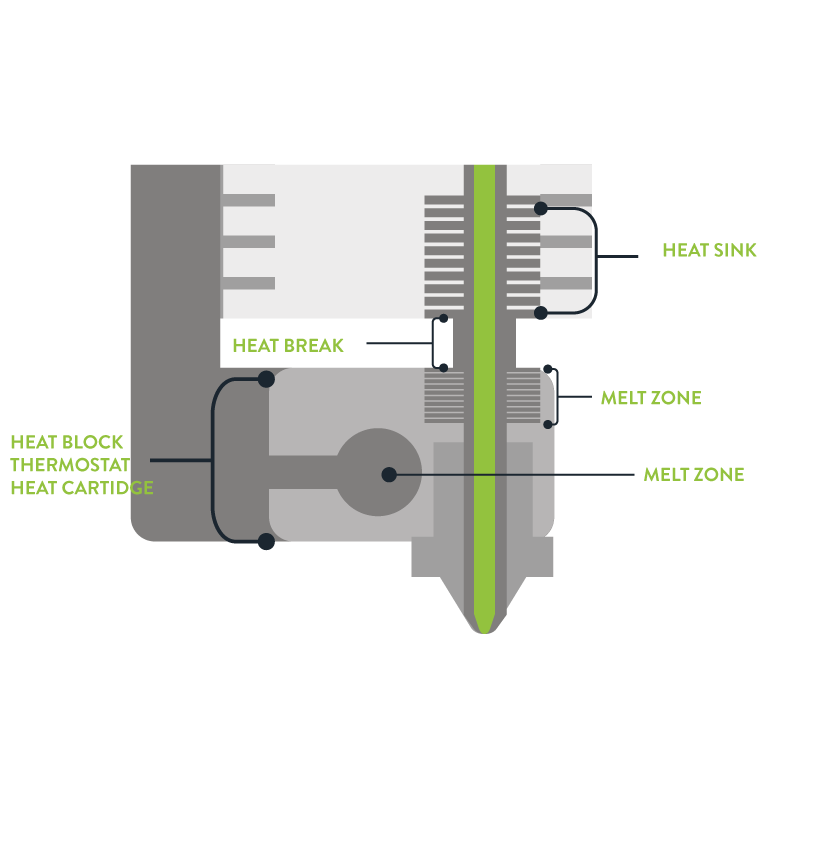
A hot end is where the filament is melted then extruded through a nozzle. Hot ends come in many forms but the standard ones consist of a feed tube, a heatsink, thermal barrier tube with a heat-break, heat-block and the nozzle in that order.
The feed tube guides the filament from the extruder, down through the heatsink and thermal barrier tube. The purpose of the heat sink and thermal barrier tube is twofold. The top most part of the thermal barrier tube is located within the heatsink and feeds the filament through. The bottom section of the thermal barrier tube is connected to the heat block where the filament is melted. Just before it however, the thermal tube is thinner and this area is called the heat-break. This is all done to ensure that before the filament reaches the heat block, that the temperature is lower, prevent melting of the filament before it reaches the heat block by a process called heat creep. The heat-break creates a sudden change in temperature so as to better have control of the melting process.
Enclosure
An enclosure is having a sealed off printing environment for the 3D printing process. The reasoning for this is for safety but also to create better temperature management to ensure better printing results. Due to the nature of utilising high-temperature processes, issues with overheating plastics can create fumes on select printing materials, such as ABS. An enclosure ensures you have
Furthermore, an enclosure ensures that the internal ambient temperature of the printer is stable which plays a major roll in reducing printing issues such as warping and cracking.
Filament
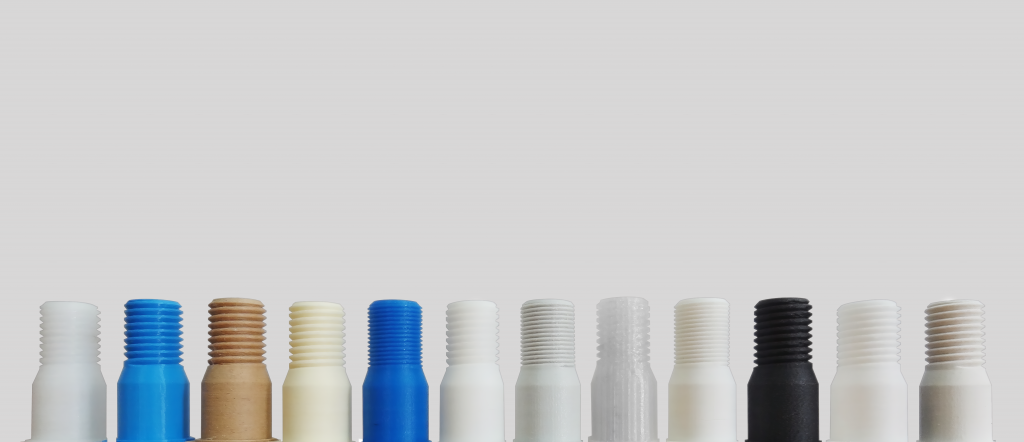
A filament in the context of Filament Fused Fabrication (Fused Deposition Modelling) is a coil of thermoplastic or a composite that comes in various diameters. The filament is fed through the printer and then into the extruders where it is melted then extruded. Unlike other 3D printing techniques, the filament is solid and cost-effective for many organisations. Additionally, it is the safest printing 3d printing technique which is a major factor in its popularity.
Materials that are available are various plastics, like PLA, PETG and composites where plastic is mixed in with other materials like wood to allow for a variety of possible 3D printing parts. FFF has the largest selection of materials and each year, more materials are added to the roster. This gives FDM a greater edge than other 3D printing techniques in terms of versatility. However large the selection of materials, currently there isn’t a major metal filament available and the ones that are available require extra steps like sintering to finish a metal 3d printed part.
3D Printing Process
Layer height
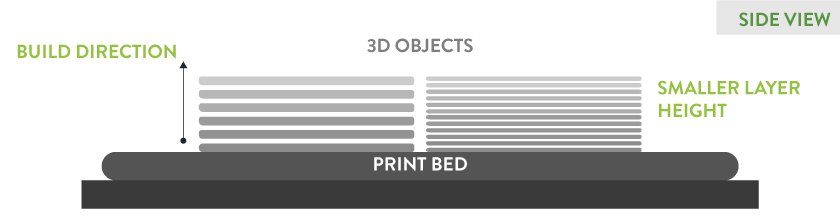
Layer height is the thickness of each 3D printed layer of an object. This can also be called the Z Resolution which is referring to the process of creating each layer as the print bed moves down to allows for another layer.
A smaller layer height yields better quality objects with stronger strength properties. This is due to better interlayer adhesion, reducing gaps and creating a smoother overall finish for the object. This is most apparent when printing curves, where you can see the stepping of the edges.
Smaller layer heights however require more printing time, therefore the selection showed have careful thought before the printing process begins.
Print Speed
Print speed refers the traveling speed of the extruders as they travel during the printing process. It is express in mm/s and also determines the print quality of an object. A balance must be met in terms of print speed when making adjustment before the printing process because it does affect other settings. For example, faster speed will require more temperature awareness since increasing the speed will usually reduce the quality of the print. As a side note, we must not confuse print speed with travel speed, which is the speed at which the extruders when not directing printing.
Software Terms
Slicer
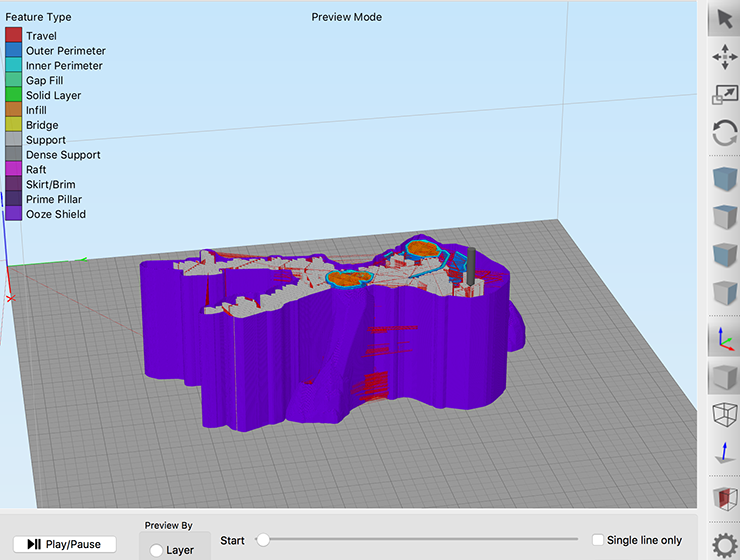
Slicing software is a category of 3D printing software that is used to convert a basic 3D computer object into something that the printer can understand and print accurately. There are various options of slicing software but they all work with the same output. They can take a 3D object, convert the surface into miniature triangles, that come together to make the object. The amount of these triangles also determines the accuracy and detail in the 3D object that can be printed. Within the application, you can get detail controls about the printer, how to print the object, orientation, material settings and all settings possible for the 3D printer.
After setting the desired parameters, the slicer software can then slice the 3D object into the desired layer height and visualized the printing process. When this is completed, the object file is then converted into G-code, which a data type used in many manufacturing processes that stores information about how to print or in the case of CNC machine, how to mill an object. This G-code is what drives the extruders in the 3D printer to accurately create the object.
Infill
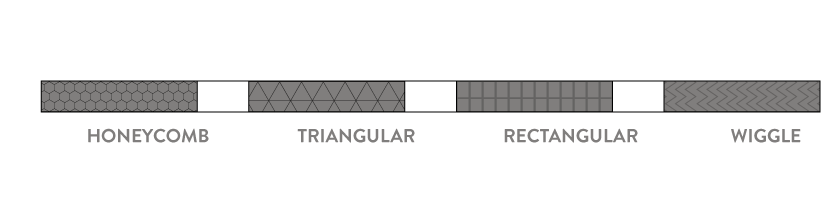
Slicing software gives you the option to print a fully solid object, or a hollow one and everything in-between. This is accomplished through setting the infill amount. This is usually how the internal structure of an object is to be printed and the settings range from 5% infill to 100%. Furthermore, you get four main infill pattern types which are honeycomb, wiggle, rectangle and triangular.
Honeycomb offers the greatest strength with minimum material, triangle offers better lateral load strength, which gives the outer shell of the object better strength to handle horizontal forces applied to the object. Wiggle is mainly used for flexible materials and rectangular doesn’t have any specific advantages.
Skirts and Brims

Brims, skirts and rafts are parts that at are used to create better bed adhesion for the 3D printed object before the printing process and to check that everything is set-up correctly.
A skirt is an outline of the print area of the object, but doesn’t directly touch the object. It is used as a primer, to check whether there is excess material in the nozzles, that they are calibrated correctly and to ensure consistent material flow.
A brim is directly attached to the object, but goes a little further out and involves more outlines than the skirt. Its main purpose is to hold the object and to ensure the first layer is printed correctly.
Common Troubleshooting Terms
Warping
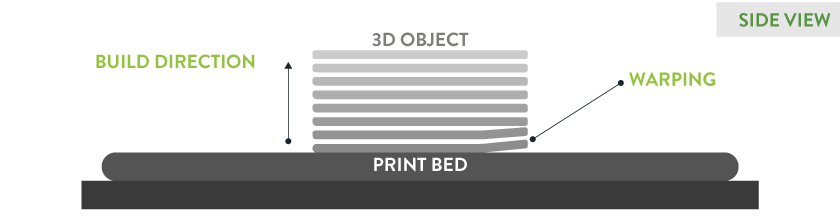
Warping can be described as the shrinkage of a 3D printed object at the corners of the base, mainly attributed to temperature changes. Warping is due to the process of non-uniform cooling where certain printing layers cool faster than the heated parts. When this occurs, the cooler layers end up distorting the objects geometry since cooling causes shrinkage and this action affects the immediate molten layers. As the areas cool and harden, they pull on other layers as cooling increases. The main reason for warping is heated thermoplastics need uniformed cooling after being extruded to allow an object to accurately settle while maintaining the desired geometry. If the printing bed is not heated or the ambient temperature of the print chamber is not modulated then this leads to different cooling rates. To prevent warping issues, ensure that the FFF 3d printer has a heated bed with a metal plate. This distributes the heat throughout the bed and means a more uniformed temperature distribution. This will minimize the effects of warping in the first layers of the object.
Cracking
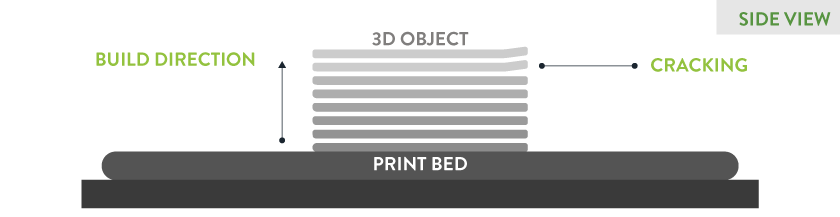
Cracking is caused by the same issue as warping, being the non-uniform cooling of a printed object. The difference of cracking from warping is cracking occurs at different locations in the printed object. To offset the possibility of cracking, a printer with an enclosure allows to eliminate the ambient temperature fluctuations that may occur that could lead to cracking of a 3D printed object.

Experience the high 3d printing quality of the Bolt Pro. Request a print sample for FREE now!
Do you want to know how 3D printing can HELP you and your business? Talk to our experts about a FREE, PERSONALIZED solution suitable for your situation!